
Right off the bat, I should tell you I'm not a mastering engineer. I know too much about the 'black art' of mastering to know that I have no place doing it. That said, in my mind the line between mixing and mastering is much more vague than ever before. I consider myself a mixing engineer, but I will craft my mixes with mastering in mind, and will try to coax things to a place where a mastering engineer won't have to do too much to fix my mixes. It's already competitive enough in this field, and I need to be able to make my clients feel like they're getting everything they pay for. Sadly, the pay usually stops at the mixing process, and I find myself doing quasi-mastering for clients, since a lot of them don't understand that mastering should be an additional step. C'est la mixing vie...
I recently tried my hand at doing some 'serious' mastering, in competition with a friend of mine. We both used the same 2-track mix, which neither of us mixed but were close to the project. We gave ourselves a couple hours, so I didn't get a chance to do all the requisite listening tests in various environments (listening through an open door in another room being a particularly revealing test). I figured I had the opportunity to try some new techniques that I haven't really used in a mastering sense. Here's a look at what I did:
First, a bit about the session itself. I had two tracks of the original mix, using one as a reference of where I started off. I also imported some other reference tracks to see how far I might have to go. There are three ways in which the audio flowed: the original audio track, which then had three tracks of parallel processing being sent to from sends, and which all flowed into another final aux track where more processing was applied.
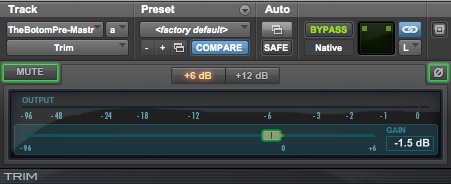
I added a little Avid Trim plugin because I wanted to be able to have some control over how hard I was hitting the first plugin in the chain, the Slate Digital VCC, and I pulled the original mix back -1.5db, just because I felt I was starting off a bit too hot.

I then added the Slate Digital VCC, which I set to an API setting and increased the drive a little bit, just to add some harmonics and saturation. The API setting helps to tighten things up in the lower mids, but still adds plenty of harmonics, so it's not as clean as the SSL setting on the same VCC plugin. I originally set it to a Neve setting but found it too unruly and hairy in the lower mids, and I knew that this track needed those areas tightened up.
Next I added some very specific cuts using the brilliant Plugin Alliance bx_hybrid mastering eq. This eq has a great feature in which selecting any frequency knob shifts that band into a very tight Q boost and you only hear what lies inside that very narrow boost. It's great for finding problem areas and really zeroing in on them. I found a boom at 70Hz, again at 372Hz, and found some nasty sibilance/cymbal zing at 10KHz. At this stage of processing, I find that cutting out bad frequencies is much better than boosting good frequencies, as now things sounded more evened out, using the more transparent technique of cutting with EQ rather than boosting.

Another nice aspect of the bx_hybrid plugin is that there is a very transparent stereo widening control, and I used it to add some width. This added more spread to the stereo field, but it also helped by making some more room up the middle by clearing some things further out towards the side. There was also a very deep 18db/octave lo-cut at 26Hz, just taking out any subsonic rumble that could be eating into my headroom. While we may not be able to hear it, that doesn't mean it's not there. Since this song had some quite aggressive synth bass parts, along with some deep kick samples, and since they were in stereo I used the Mono-Maker feature to make anything below 60Hz mono, and this seemed to do a little to help stabilize the real low end. That's a little technique I lifted from the days of transferring songs to vinyl, since having irregularities in very low frequencies could make the needle jump out of the groove.

So far I haven't done anything dramatic at all, merely adding some harmonics and tightening up the sound. It was only at this point I felt I could do some additive EQ. I turned to a very simple yet great sounding EQ, the Maag Audio EQ4.
I assume this is a vaguely Neve based plugin, but what matters is how it sounds, and this guy sounds great for what it can do. I added 1dB of 40Hz, took out 1dB of 2.5KHz, and added 5dB of 40KHz. Yup, 40KHz. Don't ask me why, nor how, but it can really add a great professional sounding sheen to things. It's called the Air Band for a reason.

The only other things I added on the original track was the Massey L2007 Limiter, not doing anything other than making sure I wasn't clipping before my next gain stage. I think I had the output set to -.1dB, and I honestly don't think it was doing anything, but it was more of an insurance policy. Last in line was the Brainworx bx_meter, showing me the levels of processing I was adding, and I kept it onscreen the whole time. I could have set the meter to show me many different kinds of metering, including the range of Katz K-Meters, but I kept it to dBVU since I was only concerned with the final output.
At this point I thought I'd do some experimenting. I had read about mixing engineer Michael Brauer's method of using many compressors in parallel, and sending different stems and instruments through them before finally summing them at the output stage. You can find more than that basic explanation here.
I ended setting up three aux tracks, each with different compressors designed to work on different aspects of the mix. First up was my go-to compressor, the FET Compressor from Softube. Obviously it's an 1176 clone, but there are some added controls that make it so versatile.


It's set up aggressively, with a fast attack and fast release, which on this plugin is very fast. Unlike most plugins that have a sidechain input (but not the original 1176 hardware unit) this one has a built-in high and low cut that only affects how this compressor reacts. Using a lot of cutting, I got the FET Compressor to really grab onto the midrange of the song, and really start pushing it into an in-your-face sound. Because it's on its own aux track, I slowly pushed the fader up until I started hearing it. The final fader setting was somewhere around -25dB, so it's only a very small part of the overall sound, but very effective in making the heart of the song sound more exciting.
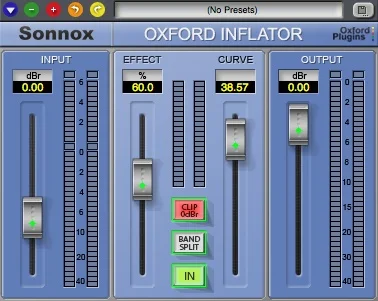
I wanted to make the drums and transients pop a little more, so I turned to a great drum compressor, the Sonnox Inflator. I pushed up the Effect fader and especially the Curve fader, which makes things a bit brighter and 'pokier'. Again, since this was in parallel I only added enough to gain a punchier drum sound, and I think the aux track ended up somewhere around -20dB.
For my next trick, I felt that I was losing some of the immediacy of the female vocal track, so I looked for some way to bring that back, but EQ would also accentuate the snare and guitars. I tend not to use multi-band compressors a lot, but I knew there was an extreme preset on Waves' C4 Multi-Band Compressor that could work.

The original track and the three parallel tracks all summed to another aux track, on which I added some more processing. First up was the Slate Digital VCC Buss plugin, again set to an API setting, with the Drive pulled back just a little.
Next was another instance of the bx_meter mastering EQ, doing some more small cuts. You're probably thinking this is too many plugins, but I feel that it's the opposite of death by a thousand cuts, rather, since I'm only asking each plugin to do a little bit of work, no one plugin is doing any heavy lifting and it all adds flavor and spice and everything nice.
It's pretty extreme compression in the high end, but by adding just a little bit in parallel I found it acted like an Aural Exciter, just putting back some energy into making the vocals pop out with some more diction and immediacy. The parallel aux fader ended up around -30dB, so a little bit of a lot ended up sounding good.

Another non-invasive low-cut at 24Hz, just making sure the subsonic range stayed clean, then a 1.2dB cut at 75Hz, and some more cutting at 210Hz and again at 4.9KHz, taking out some edginess I was hearing. I felt I could add a little bit more width, so I added it at this stage.

Now for my final bus compressor, which in actuality is three different compressors, mangled together into the beast known as the Slate Digital VBC. I rearranged the order in which I hit the compressors, having it hit the FG-Red compressor first, just to tickle the transients and add some energy. A 2:1 ratio and medium attack time meant it wasn't too aggressive. I also set a pretty high high pass filter so that it wasn't triggered by the massive kick sound I already had going.
Moving on, I had the signal hit the FG-Grey compressor, which is a clone of the classic SSL Bus Compressor. Here's where I added some aggressiveness, with a 4:1 ratio and fast release. No high pass filter meant that I was getting some pumping from the kick drum, which is what I wanted. I liked the sound, but ended up backing off on the Mix control, to add more of the original signal back in.

The final stage of the compressor was Slate's version of the ultra-rare Fairchild 670 compressor. I usually look to a Fairchild to smooth things out and add heft and warmth, but I decided to try a different route. This plugin can do Mid/Side compression, where I could address things in the mono field separately from the stereo field. I wanted to make sure that the vocals, bass, kick and snare stood out, and since these were all mono sources panned up the middle I added some compression, maybe 2-3dB at the loudest parts of the song, with only a dB or two of make-up gain. All this did was make those mono elements pop with a little more excitement, while the stereo field of guitars, cymbals, keyboards and synths kept their same dynamics. The Side compression wasn't doing anything, since I only wanted to effect the Mid signal.
At this point I was very very close to being happy with the final mastering job I'd done, but I wanted to add one more flavor over the entire mix, and that was the Slate Digital VTM. I backed off the Input so it wasn't being hit too hard, but with normal bias, at 30ips and a 2" 16 track machine, I found it softened the high end just a little, added a little bass saturation, and just gave it a little more energy overall.


My final plugins were another Massey L2007, not doing anything other than making sure no quick transients clipped the final output. Another bx_meter was kept onscreen to see how the different gain stages were interacting, and that's it. Lots of plugins, I know, but I think the end result was pretty tame considering how many plugins I ended up using. Since they weren't doing much, they all just added layers of flavor and energy.
Here is the full un-mastered song, as mixed by Ryan and Shawn.
Here's the full song after the mastering job I quickly did. It sounds very different than the un-mastered version, but if you've been playing the audio files that accompany each processing stage I think you'll see that I'm not asking any particular plugin to do too much, and I think that that philosophy gives pretty decent results.
Again, I want to stress that I am not a mastering engineer, and that this was done in a couple hours on a dare from a friend, so I used some techniques that are a bit strange, just because I wanted to see how they would work. Thanks for reading this very long article.