Mixing

Hacking a Bus Compressor When Making Stems

Nowadays it's pretty common to use a bus compressor over your whole mix. This can add those mythical qualities like 'glue' or 'warmth'. Or a bus compressor can make things louder, not that there's anything wrong with that. But what happens when you need to send someone stems of your mix? If you just print the individual elements through that magical bus compressor, your stems won't sound right when you combine them later. The guitars won't be reacting to the snare drum hits, the vocals won't duck the guitars, and the kick drum won't combine with the bass guitar to create that platinum record sound. So what can we do? If you have a compressor with a sidechain input, it's pretty easy. 

Print your whole mix, but don't print it through your buss compressor. Bypass that, and you'll have a 2-mix of your song minus any compression. Go ahead and assign that printed 2-track to the sidechain input of your buss compressor. Now when you go to print stems, the compressor will be responding just as it would have with everything combined, but it is now showing it's total effect on individual elements of the mix!

Click to enlarge


Compression Tips Using Clip Gain

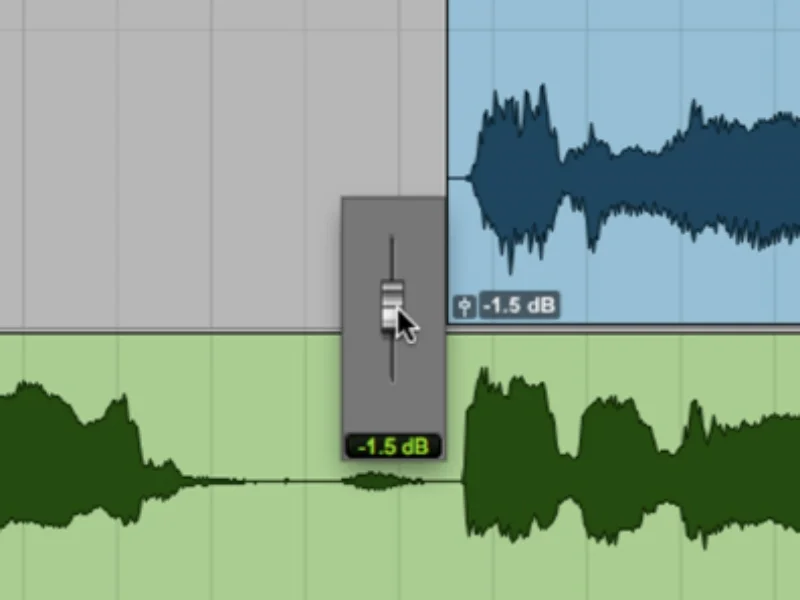
With the introduction of Pro Tools 10, we had access to a new feature called Clip Gain. In essence, you could change the gain of a clip, pre-fader and pre-insert, right on the clip itself. This was cool for a number of reasons, but there's an aspect of clip gain that I hadn't used until very recently. Basically, you can insert a compressor on a track and use clip gain to drive that compressor harder during different parts of a song.

Adjusting Dynamics with Clip Gain

Adjusting Dynamics with Clip Gain

Adjusting Dynamics with Volume Automation

Adjusting Dynamics with Volume Automation

These two screenshots show the same guitar parts, with my Clip Gain adjustments highlighted in the top photo, and the automation moves that I made in the bottom photograph. On the surface, all I'm doing is adjusting the level in two different ways, but it's a lot more powerful than that. Both these tracks have a compressor on them, and I wanted to bring out more excitement and power in specific sections of the song, so I used Clip Gain to drive the input of the compressor harder, and the resulting tonal changes I could then ride using volume automation.

Try it out for yourself, and see if you can't use both Clip Gain and volume automation in your work.

Parallel Master Bus Compression

As an addendum to my Bus plugin video, here's a little video explaining how I use a multi-parallel signal chain to achieve bus compression with three different compressors. It's a kind of Michael Brauer technique, but mine is a bit simpler and set up differently. 

This doesn't work for every song, but if you're interested I go over how I set this up and the practical benefits.

My Bus Plugins

It's become a big part in how mix engineers get their sound, and so I thought I'd share a little video going over what plugins I use for my master bus, and how I set them up. Take a look and feel free to share what you use on your bus.

Featured plugins include:

Slate Digital's Virtual Channel Collection, Virtual Tape Machine and Virtual Bus Compresser

Massey's L2007 Limiter

Brainworx bx_hybrid and bx_meter

Maag EQ4


- Not long after this video was shot I picked up the Clariphonic DSP plugin from Kush Audio. I've only had it for a couple days, but it seems like an amazing tool for adding high end sheen to things. So far I've been using it in place of the Maag EQ. It's not a normal EQ, in that it works only on the upper mids and top, and it does so in parallel. It's almost scary how much high end you can add without it sounding weird. It sounds so natural that it's effect is really only noticeable when you bypass it and everything sounds dull. 

clariphonic_dsp_hires.jpg

I guess it goes to show you how right I was when I said in the video that these plugins on my master bus can change next week. Always be open to changing things up!

Avid EQIII Hidden Feature

If you use Pro Tools, then you're probably very familiar with the stock EQIII 7-band eq that comes standard with Pro Tools. It's a useful eq, though not with any sort of "character", but sometimes that's a good thing. Very recently I came across a key command trick to get access to a hidden feature of the EQIII. If you hold down Shift and Control while you adjust a frequency band, the band goes into solo mode and you can hear whatever is only inside that narrow band. It's a trick that is common to Brainworx eq's, but I had no idea that you could do this with the stock Avid eq. Here's a little video showing it in action.

Make Things Wider By Making Them Mono

Ever since stereo records came out in the 1960s people have been trying to get their mixes to sound as wide as possible. People think that having all their tracks recorded in stereo means that their mixes will be guaranteed to be wide, but that's usually the opposite of the way things turn out. If you're guitars are panned hard left and hard right, and so are your pianos and drums and everything else, then there's no contrast in your mix. Everything is in both speakers and the ear has trouble separating your mix.

Contrast can come from many different avenues, and taking mono sources and panning them around is one of the easiest and best ways of creating contrast in a mix. If you are given source files that are all stereo, make sure they're truly stereo, and not just a stereo track. If the source isn't truly stereo, consider throwing away one side and panning the remainder to help it sit in the mix or stick out of the mix. You could also use any number of plugins to reduce the stereo width of a track. Most plugins that aim to widen the stereo field can also reduce the stereo field, so don't think of them as one-trick ponies. Confining the stereo width of an instrument can help you place it in a specific area of the stereo spectrum.

Favorite EQs Part 1

When it comes to choosing an EQ, I find that there are two different outcomes I'm looking for, and that will steer me towards one of two genres of EQ. For instance, there are occasionally problems with a track where EQ is the best way to deal with things, whether the problems be ringing, boominess, or a general buildup of frequencies that I want to eliminate. In those instances I gravitate towards very clean-sounding surgical EQs. The Maag EQ4, by Plugin Alliance, is nowhere near being in that camp! This EQ is colorful (obviously, look at those knobs), and is drop dead simple to use, but the simplistic controls mask a very deep plugin.

As you can see, the controls are very sparse, mostly consisting of a fixed frequency controlled by a gain knob. That may seem very limiting, but it's an extremely well thought out design. The gain is stepped in .5db clicks, and I never thought I'd say this but I can totally hear a half decibel change in many of the bands. Adding .5db at 2.5kHz and 40Hz makes kicks and snares more powerful. Adding .5db at 650Hz and cutting .5db at 2.5kHz makes electric guitars less buzzy and sit better in some songs. I sometimes find myself adding a decibel or less of just one frequency band, and moving on to the next track. 

image.jpg

The main reason I bought this plugin is because of the peculiar Air Band, which you can see goes all the way up to 40kHz, way past what humans can hear. I don't know what kind of voodoo is in this thing, but I can add 4-5db of stuff only dogs and bats hear, and it sounds amazing. I may be adding gain to a shelf that high, but it's affects reach into the high end of human hearing, and it's pretty obvious to hear what you're doing. I tend to pop this plugin on vocals, acoustic guitars or horns, set the Air Band to 40kHz and raise the gain til it sounds angelic, then back the gain off a bit. We can't have things sounding too angelic, can we?

It wasn't until after I'd demoed the EQ4 and bought it did I spend much time messing with the other bands (the Air Band is that good!), since I thought the choice of fixed frequencies was too limiting. While the EQ4 doesn't always work out, it's a beautiful sounding bit of gear when it does. The amazing/hidden genius of this plugin lies at the extreme low end, not just the extreme high end. The Sub knob isn't labeled with a frequency, but I've heard that it operates at 10Hz. That's right, there's another range you can control that is outside of human hearing, this time it's subsonic rumble. 

All in all, this is a great sounding and very easy to use EQ, and I find myself using it a lot on vocals, pianos, acoustic guitars, and even on my mix bus.

Mastering For Fun. Not Profit.

Right off the bat, I should tell you I'm not a mastering engineer. I know too much about the 'black art' of mastering to know that I have no place doing it. That said, in my mind the line between mixing and mastering is much more vague than ever before. I consider myself a mixing engineer, but I will craft my mixes with mastering in mind, and will try to coax things to a place where a mastering engineer won't have to do too much to fix my mixes. It's already competitive enough in this field, and I need to be able to make my clients feel like they're getting everything they pay for. Sadly, the pay usually stops at the mixing process, and I find myself doing quasi-mastering for clients, since a lot of them don't understand that mastering should be an additional step. C'est la mixing vie...

I recently tried my hand at doing some 'serious' mastering, in competition with a friend of mine. We both used the same 2-track mix, which neither of us mixed but were close to the project. We gave ourselves a couple hours, so I didn't get a chance to do all the requisite listening tests in various environments (listening through an open door in another room being a particularly revealing test). I figured I had the opportunity to try some new techniques that I haven't really used in a mastering sense. Here's a look at what I did:

First, a bit about the session itself. I had two tracks of the original mix, using one as a reference of where I started off. I also imported some other reference tracks to see how far I might have to go. There are three ways in which the audio flowed: the original audio track, which then had three tracks of parallel processing being sent to from sends, and which all flowed into another final aux track where more processing was applied.

Channel - Version 2.jpg

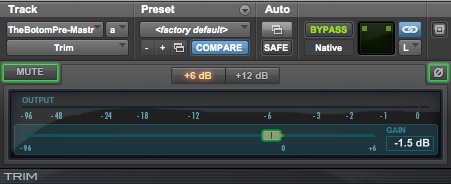
I added a little Avid Trim plugin because I wanted to be able to have some control over how hard I was hitting the first plugin in the chain, the Slate Digital VCC, and I pulled the original mix back -1.5db, just because I felt I was starting off a bit too hot.

Channel - Version 3.jpg

I then added the Slate Digital VCC, which I set to an API setting and increased the drive a little bit, just to add some harmonics and saturation. The API setting helps to tighten things up in the lower mids, but still adds plenty of harmonics, so it's not as clean as the SSL setting on the same VCC plugin. I originally set it to a Neve setting but found it too unruly and hairy in the lower mids, and I knew that this track needed those areas tightened up.

Next I added some very specific cuts using the brilliant Plugin Alliance bx_hybrid mastering eq. This eq has a great feature in which selecting any frequency knob shifts that band into a very tight Q boost and you only hear what lies inside that very narrow boost. It's great for finding problem areas and really zeroing in on them. I found a boom at 70Hz, again at 372Hz, and found some nasty sibilance/cymbal zing at 10KHz. At this stage of processing, I find that cutting out bad frequencies is much better than boosting good frequencies, as now things sounded more evened out, using the more transparent technique of cutting with EQ rather than boosting. 

Channel - Version 6.jpg

Another nice aspect of the bx_hybrid plugin is that there is a very transparent stereo widening control, and I used it to add some width. This added more spread to the stereo field, but it also helped by making some more room up the middle by clearing some things further out towards the side. There was also a very deep 18db/octave lo-cut at 26Hz, just taking out any subsonic rumble that could be eating into my headroom. While we may not be able to hear it, that doesn't mean it's not there. Since this song had some quite aggressive synth bass parts, along with some deep kick samples, and since they were in stereo I used the Mono-Maker feature to make anything below 60Hz mono, and this seemed to do a little to help stabilize the real low end. That's a little technique I lifted from the days of transferring songs to vinyl, since having irregularities in very low frequencies could make the needle jump out of the groove.

Channel - Version 5.jpg

So far I haven't done anything dramatic at all, merely adding some harmonics and tightening up the sound. It was only at this point I felt I could do some additive EQ. I turned to a very simple yet great sounding EQ, the Maag Audio EQ4.

I assume this is a vaguely Neve based plugin, but what matters is how it sounds, and this guy sounds great for what it can do. I added 1dB of 40Hz, took out 1dB of 2.5KHz, and added 5dB of 40KHz. Yup, 40KHz. Don't ask me why, nor how, but it can really add a great professional sounding sheen to things. It's called the Air Band for a reason.

Channel - Version 4.jpg

The only other things I added on the original track was the Massey L2007 Limiter, not doing anything other than making sure I wasn't clipping before my next gain stage. I think I had the output set to -.1dB, and I honestly don't think it was doing anything, but it was more of an insurance policy. Last in line was the Brainworx bx_meter, showing me the levels of processing I was adding, and I kept it onscreen the whole time. I could have set the meter to show me many different kinds of metering, including the range of Katz K-Meters, but I kept it to dBVU since I was only concerned with the final output.

At this point I thought I'd do some experimenting. I had read about mixing engineer Michael Brauer's method of using many compressors in parallel, and sending different stems and instruments through them before finally summing them at the output stage. You can find more than that basic explanation here.

I ended setting up three aux tracks, each with different compressors designed to work on different aspects of the mix. First up was my go-to compressor, the FET Compressor from Softube. Obviously it's an 1176 clone, but there are some added controls that make it so versatile.

Channel - Version 7.jpg
Auxes.jpg

It's set up aggressively, with a fast attack and fast release, which on this plugin is very fast. Unlike most plugins that have a sidechain input (but not the original 1176 hardware unit) this one has a built-in high and low cut that only affects how this compressor reacts. Using a lot of cutting, I got the FET Compressor to really grab onto the midrange of the song, and really start pushing it into an in-your-face sound. Because it's on its own aux track, I slowly pushed the fader up until I started hearing it. The final fader setting was somewhere around -25dB, so it's only a very small part of the overall sound, but very effective in making the heart of the song sound more exciting.

Auxes - Version 2.jpg

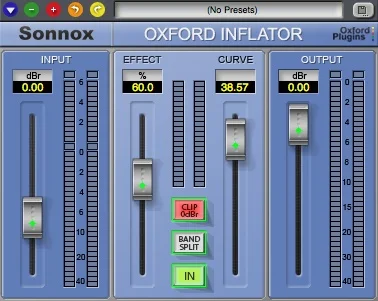
I wanted to make the drums and transients pop a little more, so I turned to a great drum compressor, the Sonnox Inflator. I pushed up the Effect fader and especially the Curve fader, which makes things a bit brighter and 'pokier'. Again, since this was in parallel I only added enough to gain a punchier drum sound, and I think the aux track ended up somewhere around -20dB.

For my next trick, I felt that I was losing some of the immediacy of the female vocal track, so I looked for some way to bring that back, but EQ would also accentuate the snare and guitars. I tend not to use multi-band compressors a lot, but I knew there was an extreme preset on Waves' C4 Multi-Band Compressor that could work.

Auxes - Version 3.jpg

The original track and the three parallel tracks all summed to another aux track, on which I added some more processing. First up was the Slate Digital VCC Buss plugin, again set to an API setting, with the Drive pulled back just a little.

Next was another instance of the bx_meter mastering EQ, doing some more small cuts. You're probably thinking this is too many plugins, but I feel that it's the opposite of death by a thousand cuts, rather, since I'm only asking each plugin to do a little bit of work, no one plugin is doing any heavy lifting and it all adds flavor and spice and everything nice.

It's pretty extreme compression in the high end, but by adding just a little bit in parallel I found it acted like an Aural Exciter, just putting back some energy into making the vocals pop out with some more diction and immediacy. The parallel aux fader ended up around -30dB, so a little bit of a lot ended up sounding good.

Master - Version 7.jpg
 

Another non-invasive low-cut at 24Hz, just making sure the subsonic range stayed clean, then a 1.2dB cut at 75Hz, and some more cutting at 210Hz and again at 4.9KHz, taking out some edginess I was hearing. I felt I could add a little bit more width, so I added it at this stage.

Master - Version 6.jpg

Now for my final bus compressor, which in actuality is three different compressors, mangled together into the beast known as the Slate Digital VBC. I rearranged the order in which I hit the compressors, having it hit the FG-Red compressor first, just to tickle the transients and add some energy. A 2:1 ratio and medium attack time meant it wasn't too aggressive. I also set a pretty high high pass filter so that it wasn't triggered by the massive kick sound I already had going.

Moving on, I had the signal hit the FG-Grey compressor, which is a clone of the classic SSL Bus Compressor. Here's where I added some aggressiveness, with a 4:1 ratio and fast release. No high pass filter meant that I was getting some pumping from the kick drum, which is what I wanted. I liked the sound, but ended up backing off on the Mix control, to add more of the original signal back in.

Master - Version 5.jpg

The final stage of the compressor was Slate's version of the ultra-rare Fairchild 670 compressor. I usually look to a Fairchild to smooth things out and add heft and warmth, but I decided to try a different route. This plugin can do Mid/Side compression, where I could address things in the mono field separately from the stereo field. I wanted to make sure that the vocals, bass, kick and snare stood out, and since these were all mono sources panned up the middle I added some compression, maybe 2-3dB at the loudest parts of the song, with only a dB or two of make-up gain. All this did was make those mono elements pop with a little more excitement, while the stereo field of guitars, cymbals, keyboards and synths kept their same dynamics. The Side compression wasn't doing anything, since I only wanted to effect the Mid signal.

At this point I was very very close to being happy with the final mastering job I'd done, but I wanted to add one more flavor over the entire mix, and that was the Slate Digital VTM. I backed off the Input so it wasn't being hit too hard, but with normal bias, at 30ips and a 2" 16 track machine, I found it softened the high end just a little, added a little bass saturation, and just gave it a little more energy overall. 

Master - Version 4.jpg
Master - Version 3.jpg

My final plugins were another Massey L2007, not doing anything other than making sure no quick transients clipped the final output. Another bx_meter was kept onscreen to see how the different gain stages were interacting, and that's it. Lots of plugins, I know, but I think the end result was pretty tame considering how many plugins I ended up using. Since they weren't doing much, they all just added layers of flavor and energy.

Here is the full un-mastered song, as mixed by Ryan and Shawn.

Here's the full song after the mastering job I quickly did. It sounds very different than the un-mastered version, but if you've been playing the audio files that accompany each processing stage I think you'll see that I'm not asking any particular plugin to do too much, and I think that that philosophy gives pretty decent results. 

Again, I want to stress that I am not a mastering engineer, and that this was done in a couple hours on a dare from a friend, so I used some techniques that are a bit strange, just because I wanted to see how they would work. Thanks for reading this very long article.

Favorite Compressors Part 1

I thought I would take a second and share some of my favorite bits and bobbles of plugin gear, starting off with some of my favorite compressors. I find that compressors can be some of the most misunderstood and misused pieces of audio gear out there, but they're really important and I couldn't do a mix without them. Well, I could, but I really wouldn't want to.

Up first is a compressor that I probably use more than any other on a given mix: the FET Compressor by Softube.

Fet Compressor

As you can see, it's an 1176 style compressor, with a bunch of added modifications. As with most 1176 style compressors, this one moves fast and is quite grabby, like a Black Friday event at Walmart, but much better and with less greed. It's speed and overall aesthetic makes it great for drums, which is something I always try putting it on, almost as de rigueur. It works much more often than it doesn't, which may sound like a backhanded compliment, but that's the best sign of a great piece of gear in my opinion. It's a staple on snare drums, and the built-in parallel feature means that it's great for drum bussing as well. Combining the "All Buttons In" with the low cut set pretty high makes for a stupid sound (but in the best possible way), and turning the parallel knob all the way up, then backing it off until it feels just right is a great way to retain clarity with added mayhem.

Another common use I've found for the FET Compressor is on vocals, especially female rock vocals. It can give you a really great modern vocal sound, punchy and in your face, and bring out all the little details in a voice. Again, having the low and high cut in the detector signal really makes it powerful, so instead of using the low cut to stop a kick drum from triggering the compressor, I sometimes use the high cut to help stop the sibilance from a vocalist splattering all over the compressor. I also tend to dial in a very fast attack and release for rock vocalists, and turn up the parallel knob to bring back some of the original flavor. A lot of times I'll end up using this compressor on a vocal to bring up the details and make it punchy, then add a slower compressor afterwards to smooth things out.